Introduction
In software engineering, knowing how to use things isn’t as fun as knowing how to build things. Recently, I wanted to revisit C and started reading “Let Us C,” focusing on important concepts like pointers and structs. Instead of just reading, I thought it would be more fun to build a project to remember these concepts better.
I decided to build a custom shell and followed some blogs and created my own simplified version. While working on it, I became interested in how CLI functions, which inspired me to consider making my own.
I also wanted to learn FFmpeg and got interested in how it works internally, which led me to libav, the library FFmpeg uses. I decided to make a mini version of FFmpeg.
While setting up FFmpeg for the project, I faced some issues that were only fixed by using the absolute FFmpeg path. Since I was also doing a course on Docker, I thought it would be a good idea to use Docker for this project to avoid the issues I faced locally. This way, anyone can run it on their system without needing FFmpeg or C/GCC setup.
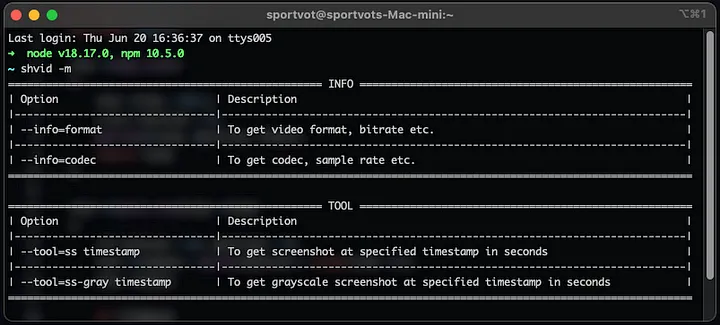
In the end, it all came together. With C, FFmpeg, and Docker, I created a small project called “shvid” (sh from shell and vid from video). This tool lets you get video info like codec and bitrate, and take a screenshot from a video at a specific timestamp.
Creating a Custom Shell
One of the first challenges I took on was building a custom shell. This involved implementing functionalities such as reading input from the command line (read_line), splitting that input into separate arguments (split_line), launching processes (launch), executing commands (execute), and creating a main loop to continuously interact with users (loop).
Reading Input and Splitting Arguments:
The read_line function uses getline to read a line of input from stdin, while split_line splits this input into tokens based on whitespace and special characters.
Launching Processes and Executing Commands:
The launch function forks a new process and executes a command using execvp. If the execution fails, it prints an error message. The execute function determines whether to handle built-in commands or launch external programs.
Main Loop:
The loop function prompts users with > and continuously reads, parses, and executes commands until the user exits.
Here is the link to the shell implementation, where you can explore the complete code.
Exploring FFmpeg and Libav
My interest in command-line interfaces led me to discover FFmpeg, a powerful tool for multimedia processing. FFmpeg’s command-line interface simplifies complex tasks like video encoding and streaming. Understanding FFmpeg and its underlying library, libav, gave me insight into multimedia codecs and formats. Inspired by FFmpeg’s efficiency, I integrated its capabilities into my project “shvid” to create a user-friendly multimedia tool. This journey deepened my understanding of multimedia processing and CLI tools, fueling my passion for innovative software development.
Screenshot Function in C
For the multimedia functionality of “shvid,” I implemented a feature to capture screenshots from videos using FFmpeg libraries. This feature allows users to specify a video file, interval, and type of screenshot (color or grayscale), leveraging the capabilities of FFmpeg for efficient multimedia handling. You can find the detailed code for the screenshot functionality here.
Solving Setup Problems with Docker
Setting up FFmpeg locally presented challenges that were resolved by Docker. Docker containers provided a solution by isolating dependencies, ensuring consistent development environments across different systems. Here is the link to the Dockerfile, which outlines how “shvid” can be containerized for seamless deployment.
Introducing “shvid”
Combining my knowledge of C, FFmpeg, and Docker, I developed “shvid” (shell + vid), a command-line tool that simplifies video processing tasks. “shvid” allows users to retrieve video information like codec details and bitrate, as well as capture screenshots from videos at specified timestamps.
You can explore the full project on GitHub: shvid.
What I Learned
Through this project, I deepened my understanding of:
- C Programming: Practical application of pointers, structs, and memory management.
- FFmpeg and Libav: Working with multimedia files, codecs, and processing techniques.
- Docker: Containerization for managing dependencies and ensuring portability.
Looking Ahead
This project is just the beginning of my exploration into software development. There’s always more to learn and build upon, whether it’s mastering new programming techniques, exploring advanced features of multimedia libraries, or refining deployment strategies with Docker.
To install “shvid” on your system and explore its capabilities, refer to the installation instructions provided here.
Conclusion
Building something is the best way to apply what you have learned. It improves problem-solving because when you actually build something, you encounter issues specific to the environment and other factors. This expands your understanding and encourages you to think from different perspectives.
Initially, my goal was simply to create a custom shell. Even though it wasn’t necessary for the main “shvid” project, I pursued it because it was my starting point. As I continued, new ideas kept emerging, leading to further development and exploration. This iterative process not only enhanced skills but also broadened creative horizons.
Thanks for reading, and happy coding! 🚀